News


Latest Forum Topics
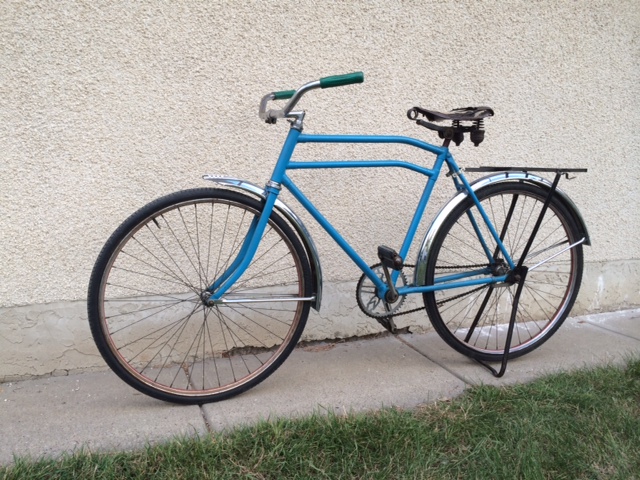
1940 CCM "Motorbike" Rebuild
 Hello Everyone,
Proud to announce that I'm the new owner of a gently used 1940 "Motorbike." You may have already seen it as it was posted here: http://www.vintageccm.com/content/vintage-1940-ccm-doublebar-single-speed-sale-cleveland-humphrey
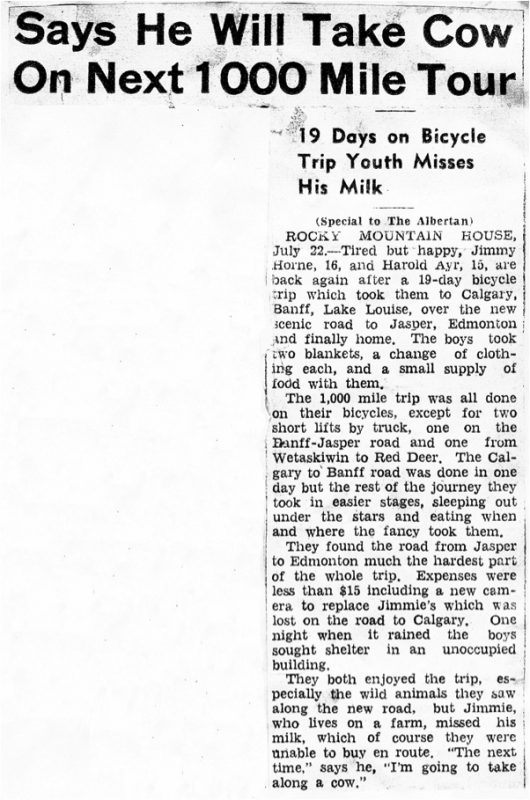
I am coming into this project not entirely as a bike guy, but rather as part of a family history project. The below clipping describes a trip my uncle took on a CCM "Motorbike." I don't know which model it was. He took the trip in 1940, the year the Banff-Jasper Highway, now called the Icefields Parkway, was first opened. He and his friend were the first people from Rocky to travel the mountain road, be it on bike or in a car/truck. Sadly, four years later he died in Germany as a Lancaster navigator with the RAF.
I am not too concerned about an exact restoration, but I would like to rebuild it in a way that it looks great and runs nicely. I have been lurking on the site for the past six weeks and have picked up a good idea of what I would like to do to bring it back to having that 1940 motorbike character.
I am lucky in that, though I have no bike mechanic experience myself, I do have a couple of family/friends who are professional mechanics, and I work in a studio with metal manufacturing and spray finish capabilities. I have a fair hand at building mechanical things and painting, so I'm quite sure I can do the old frame proud.
I'm really only here to say "Hi!" today, but I can't wait to get into the project and start asking you guys questions, and maybe some leads to where I might source parts. I'm totally in the research phase now, learning as much as I can before I start taking it down.
I guess one thing I'm looking for is whether anyone has a copy of the "Care and Operating..." owners manual from this period. I saw one page on another page (of course I can't find thie link right now...). I'd love to see some parts break downs before I start into it.
Anyway, thanks to all of the contributers who have helped me so far and look forward to talking more in the future.
Kenny Horne
Kenny: Great-looking bike and nice personal connection. All the best with the rebuild.
John
Thanks John,
Not yet sure what I will be doing to it but here is a bit of a list of posibilities:
It will take a while, I don't have many large time breaks to work on it right now, though I hope to be done by early summer.
Enjoying learning all about this old beast.
Kenny
Hi Kenny,
Nice bike you have there.
Try this blog site, he has some good information, tips and an illustrated "tear down".
http://bikeoverhaul.blogspot.ca/
Here's the exploded diagram for the rear hub that should be on the bicycle.
Hey Paul,
That's an awesome site. Just the kind of thing that I've been looking for. Will have a lot of reading and laying around in front of me.
Thanks,
Ken
Thanks T-Mar,
Might make me brave enough to start turning wrenches :-)
Kenny
Hello Kenny, I don't have what you ask but i send you the only file i have about the ccm....
okay the attachment does not work pffff, i'll send you the file by eMail.
Thanks Bikedenis, recieved the file.
This is a great forum and community. So glad to have found you guys.
Kenny
you are welcome Kenny.:D
1918 CCM Bicycle and accessories wholesale catalog from the Toronto Public Library. Wonderful resource, even if it a bit older than my interests.
https://archive.org/details/bicycleaccrepair00canauoft
Kenny
Gibson Pedal grease job.
I finally took a part off my bike :-) I figured that if I screwed up one pedal, I could always take apart the other one and remember how it went together...
The old grease was more like clay, but some turps and brushes and it came out reasonably clean. Nothing was too tight so it disassembled eary enough once I figured that I had to unscrew the inner race keeperthat came after the keyed washer. The outer bearing assembly seems to be permenantely in place. Looks like once it was put in place, the casting was punched in four places, displacing the metal to form a ledge thingy that would keep the assembly in place. Well I couldn't figure out how to take it apart anyway, and I wasn't going to start sledging my first job :-)
The cover plate had been crunched fairly badly, so I flipped a ball pean hammer in a vice and used it as a domed anvil to tap the plate back into shape. Still all scratched up and pitted, but at least it's the right shape.
Sorry about the quality of the parts layout picture. Some marine waterproof grease that I liberated from my boss, and I reassembled.
The rubber inserts are quite worn and I see that 50 bucks can fix that. Can't see physically how to replace them...
Hello Kenny Wayne Gillies a forum member has Repop Gibson end Caps for sale.I bought some and they look great $20 / .$25.00 a pair.
Ohh shiny, those do look nice. Might be that reward I give myself when I get the rest of it done.
Kenny
Cleaner Gipson Pedal parts photo
Front Wheel repack - 1940 Motorbike:
Opened up the front axel, and with a bit of a surprise, I found that The bearings were loose balls, not inside a nice little cage like on the pedals. At first I thought that the cage may have self destructed, but when I got through all the crusty muddy grease I didn't find any shards that would indicate a torn up cage. I reallly am not sure of it's original state... A couple of onlookers guessed that all was well, and that all that was needed was cleaning and sticking it back together with grease. The threads on the shaft were pretty grubby and knocked about a bit, so I ran a 3/8 x 24 die down to clean it up. Having the nuts scew on and off easily by hand certainly made reassembly easier.
I think I will need to find/make a thin 5/8" wrench to hold the bearing holder nut (not official name I'm sure) in place while I screw down what looks to be the lock nut. I'm having trouble hitting the sweet spot between too tight and too loose. Not really sure about any of this to be honest, but I won't be riding any time soon. Someone smart will be with me when I do final assembly...
Kenny
ps went to my favorite hockey game of the year, the Edmonton Oilers Rookie squad vs the University of Alberta Golden Bears. The blue line sponsor made me smile all night.
Help Needed Removing Bottom Bracket:
Hey guys, I've hit my first road block. I'm trying to remove the locking nut as shown http://photos1.blogger.com/blogger/3676/3321/1600/BB4.jpg
The nut is very thin, maybe 1/8 inch, and is hard to grab. I'm trying to turn it clockwise to loosen (reverse thread) but I just cannot seem to get a good enough grip. I've cleaned it up, a bit dirty but not rusty. I've sprayed it with lube and it's just sitting now, as I'm afraid to tackle it and bugger the nut more than it is.
The nut is large, I'm guessing about 1 3/16". I tried an adjustable wrench and the channel lock like shown on the link, and both of those caused some damage with no hint of loosening. Should I be looking for a special tool or perhaps bring it in to a shop? Or am I just missing something?
Thanks everyone,
Kenny
Hey, just saw "Flyte bottom bracket removal" thread. Maybe I'll try to make something.
Era catalogues show the CCM front hubs using a retainer with 6 balls. The only exception is the upscale CCM Flyer front hubs with loose balls. The decision to used caged bearings was almost certainly an economical decisiion, with the labour cost of installing individual balls outweighing the increased cost of bearing retainers.However, it is not uncommon for the retainers to be replaced by loose balls during routine maintenance, as they do offfer superior performance and reliability..
Most bearings used in bicycles are generically refered to as cup and cone bearings, due to the shape to the surfaces on which the bearings roll. These surfaces are generally called a "race". In a hub, the outer bearing race is roughly conical in shape and therefore referred to as the "cone race" or more simply the "cone", Conversely, the inner or hub shell is cup shaped and generally called the "cup race" or simply the "cup". Depending on the design, the orientation of the cup and cone can be reversed, such as on most three piece cranksets.
Most bicyle bearings have dedicated tools, which makes the job far more efficient and pleasant. The problem is that most modern tools are based on the metric system whereas the vintage CCM were designed using imperial measurements. Sometimes you just can't a proper fit, but in other cases there is something that is very close.
In the case of hub cones, it's generally not too hard to find those old CCM multi-wrenchs, which have hub cone notchs. However, a proper hub cone wrench will provide more leverage and be far more comfortable to handle. If I recall correctly, the CCM front hub cones are 5/8" (0.625") across the flats, which is very close to 16mm (0.629"). Consequently, a standard 16mm hub cone wrench should work well. They are available through most bicycle shops. Just take your hub or cone with you to ensure that 16mm is a good fit and I didn't remember things incorrectly.
I think most mechanics use channel lock pliers on the adjustable cone locknut of one piece cranksets, simply because they are less likely to slip off the thin nut. Another alternative is a headset wrench. Generally, they provide more leverage but are more likely to slip off. I know that one of the metric heaset sizes is a good fit for at least the 1970s version of the CCM locknut, though I don't recall which one. Maybe 30mm?
If you can't find a good fitting metric equivalent, probably ther easiest way to make a dedicated wrench is to buy the closest, undersize metric version, then file or grind the jaws to a custom fit.
Hi T-Mar, Thanks for the tips. Your descriptions really help me.
I currently have the front hub reassembled with 6 ball each side and loose, no cage. Should I try to find a pair of cages, or are they ok loose... perhaps add another ball or two to make up for the loss of the cage?
After laying out a snazy wrench design on a sheet of 1/8" steel, I thought it would be easier to go back and try my luck than it would be to cut, drill and file out my awesome new wrench :-) Well a day soaked in lube did the trick and I was able to open up the assembly. What I found inside was a bit of a surprise. All of the parts, though grimy, seemed to be in great shape, but each case only held one ball with seven others loose inside. Not sure if the loose balls were knocked out in disassembly or not, but either way, only half of the required 18 balls remain. In all the grime I didn't see any chuncks, so I'm not sure what happened. The parts cleaned up nicely, but I will be tagging and bagging them as I intend to dissassemble everything off of the frame for a paint job.
I guess I'm now on the lookout for more ball bearings. The front sprocket also is a little bent. Will try to fix/flatten it though I may also be in the market for some new cogs, as it is greared pretty high at the moment (60 front - 16 rear on 28" wheels for 87") and these old legs had a tough time pushing it up much of a hill. Of course the lack of bearings and clay like grease may have contributed to my difficulties.
Here is a photo of the bits that came out.
Thanks for all of your help guys. As you might have guessed, I'm pretty excited about all of this.
Kenny
edit : Previous post should read "front hub reassembled with 12 balls on each side."
The crank ball bearing question also reads confusingly. When said the ball may have been knocked out during disassembly I ment knocked out of the cage. I am certain that I did not loose any, that only 9 of the 18 were in the casing when I opened it up...
Thanks again Gents
Frankenstein steering-tube question: It seems that someone has welded a steering tube to the fork... well a picture is worth a thousand words. It appears very straight and a solid weld, but I will look closer tomorrow. Could this be normal, or is this some modification done later. Does it look like a bad idea? I rode the bike a bit before I tore it all apart and didn't notice any steering or strange pulling issues, but as the decades old tires were beginning to bulge, I must say that I didn't exactly put it through any paces.
Have a look. Any comments?
Ineresting photo glitch... Not sure where those photos came from, certainly not mine... will try again.
How can one get these re pop pedal caps?
Who has Waynes contact info?
EMail me I'll send you his cntact
gtflyte@hotmail.ca
Coaster break rear-hub repack question -
I have restarted my 1940 motorbike rebuild project. I have stripped, filled, primed and painted the frame and was awaiting some decals before I clear coat. They’re here now (thanks Wayne) so I’m good to go. It’s looking nice
I have put the rear hub back together after a nice cleaning but I have a question. Need I be careful not to get grease in the brake (brass) assembly? I’m packing waterproof grease around the ball bearings, but do I need to keep the braking parts clean?
Thanks guys,
Kenny in Edmonton
Hi Kenny,
When I was rebuilding a hub brake for the first time I found a website where a guy claiming to be an expert wrote that the brake surface should be greased. Against my better judgement and common sense I went ahead and greased the brake parts. Of course, afterwards I had a bike with no brakes. When I had time, I took it apart and tried to wipe the grease off the braking surfaces. This wasn't enough and the brake still didn't stop the bike properly. I will have to take it apart a third time and use brake cleaning spray to completely remove the remaining grease.
The next brake I rebuilt was a New Departure Model D. Following instructions from a different website this time, I carefully put grease on the bearings only. I dipped the 23 little brake discs in motor oil instead of grease. The instructions said thick oil so it wouldn't run off too quickly. I used 20W50 because it was what I had available. The brake worked like a charm. Best brake I ever had on a coaster brake bike.
Getting back to the CCM brake, I imagine that we are supposed to do something similar and lightly oil the braking surfaces but not grease them. And I also guess that this is what the little oil filling cap is used for on the outside of the brake hub, for adding light oil once in a while.
Can you post photos of your project when its finished? I'd love to see it. -Brian R.
Hey Brian,
Thanks. As you say common sense would suggest to keep it more or less clean though I too seem to recollect a post somehwere sayin, "Don't worry, you can't pack too much grease in there." I'll be careful. As I posted earlier, I'm not a bike guy so most of this is stuff I only partly paid attetion to 40 years ago when my dad did it for me.
I'll post pics when it looks more like a bike.
Thanks again, Kenny
We may have been reading the same site. On rebuilding hub brakes, one Sheldon Brown wrote "Single-speed coaster brakes are intended to be pretty much packed with grease. There is no part of a coaster brake that can be harmed by grease, so be generous in applying it." ....Yeah, right!!
That's the quote! I remember it clearly now
The type of lubricant to use may vary somewhat depending on the make and model of the hub. However, I'm not aware of any coaster brakes that are desiged to run totally dry. Those grooves you see in the brake sleeves are meant to channel lubricants. The earlier hubs may perform better with oil but by the time of the '37 hub it's quite clear that CCM intended these to be greased. During this period CCM marketed an eponymous grease as Bicycle Brake Lubricant and the applications specifically mentioned the sleeve. Despite the CCM branding it doesn't appear to have been a proprietary formula, as CCM suggested periodic refreshing using common 3-In-One oil!
My first experiences in bicycle mechanics occured during the mid-1960s under the tutelage of an old CCM dealer. I learned to use grease on the sleeves in a thin but thorough coating.
Thanks Tom. I never thought it should be run completely dry. It makes sense that the little filling cap is for 3-in-1 oil. I could see how a heavy oil (or light grease) would be appropriate for the brake surfaces, but not the gobs of bearing grease that Sheldon Brown described. Finally, I should mention that the grease I used was modern synthetic grease (intended for bicycle use), which was probably too effective and contributed to the loss of all stopping power.
Thanks Tom,
Perfect description of what I should be doing. You guy on this site certainly make it possible to bring one of these classics back to life.
Much appreciated,
Kenny
hey Tom, where did you get that picture of the greese can, i have the exact same NOS can, still full
Some photos of my complete-for-now 1940 Motorbike.
As I mentioned at the begining of this thread the bike is in homage to my uncle. It is part of a larger project which includes a desk and a biography of my uncle. By nice coincidence I was asked to display some of my current work and completed this just in time. The decals are from Wayne and they performed flawlessly. Thanks Wayne.
The photos are a bit grainy as the gallery lighting isn't set up yet - phone cam...
Kenny
looking good, great display
the down tube decal that you used, isn't that a headtube decal Wayne?
Ya, I think it should be a head tube decal, but I just liked it better on the down. Nothing about the bike was an intentional restoration, that being said, I didn't butcher anything if any future owner wants to restore it. I envy anyone who wants to repaint it as the foundation is now as perfect as I could get it. It was a lot of work stripping and filling before epoxy primer.
A great old bike. It rides pretty nice but I will have to do a bit of tweaking to get everything running super smooth. It was a fantastic project and I truly appreciate all of the assistance that was so freely made available to me.
Thanks again everyone,
Kenny